

Are you losing 1st, 3rd, and 5th or 2nd, 4th, and reverse?? If so, its slowly becoming the time to replace your shifter cables. If you want to save yourself about $125 for shop fees, here's a step by step write-up on how to replace them!! After freeing them up time after time, mine eventually got to the point to where I couldn't select anything at all, luckily this happened in the driveway at my house. Ok, first off, you're going to need a few things:
REMOVAL:
1.) Raise the car up on ramps and block off the rear wheels with bricks or blocks(Or in my case, you'll have to Jack the car up on jackstands). Apply the emergency brake as well.
2.) Go ahead and pop the hood and have it open.
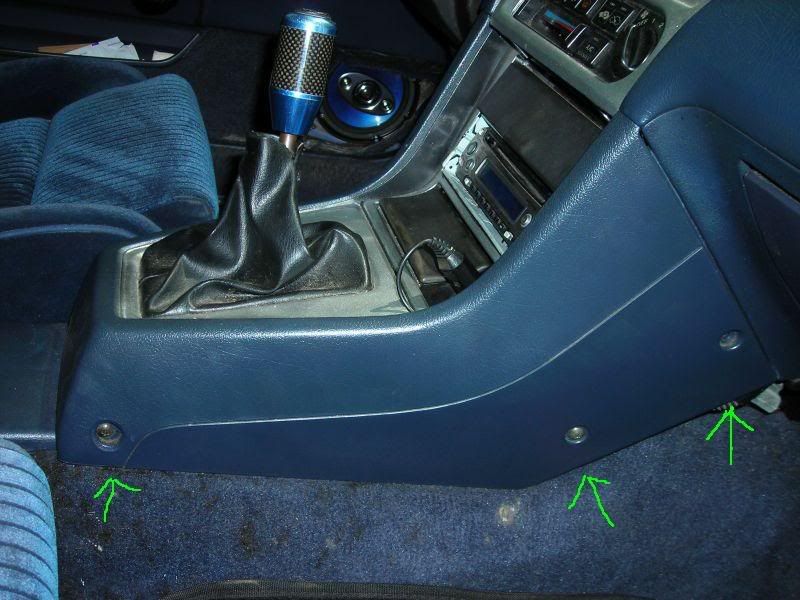
3.) Hop in the car, you will need to remove your shifter console by removing the 6 screws total. After that, work around your shift knob and it will come out. Pull the boot over the shift knob, remove the console and you're ready for the next step...
![Image]()
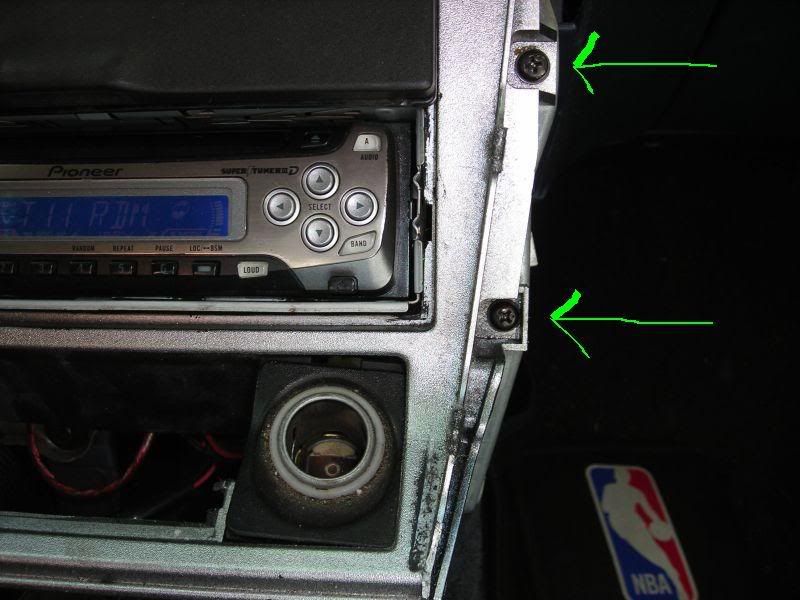
4.) Next, remove the console around your radio, ashtray, etc...Remove the 4 screws(2 on each side) as shown below:
![Image]()
5.) Once you have that undone you will need to remove the cigarette lighter by removing the 2 screws that hold it and remove the ashtray, twist the little bulb out from behind it, your radio/cd player, and the storage compartment.
Now the fun begins! Grab your needle nose pliers and your flathead screwdriver.
Next, you want to concentrate on this:
![Image]()
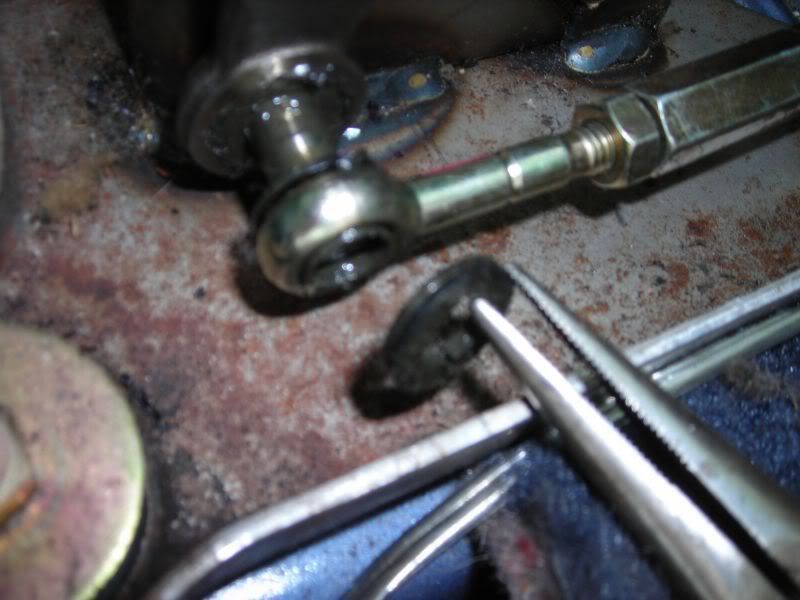
6.) Bend the cotter pin on both sides with your pliers so that it looks like this:
![Image]()
7.) Remove both cotter pins and now take these rubber washers off and keep them as you will need them for the new shifter cables:
![Image]()
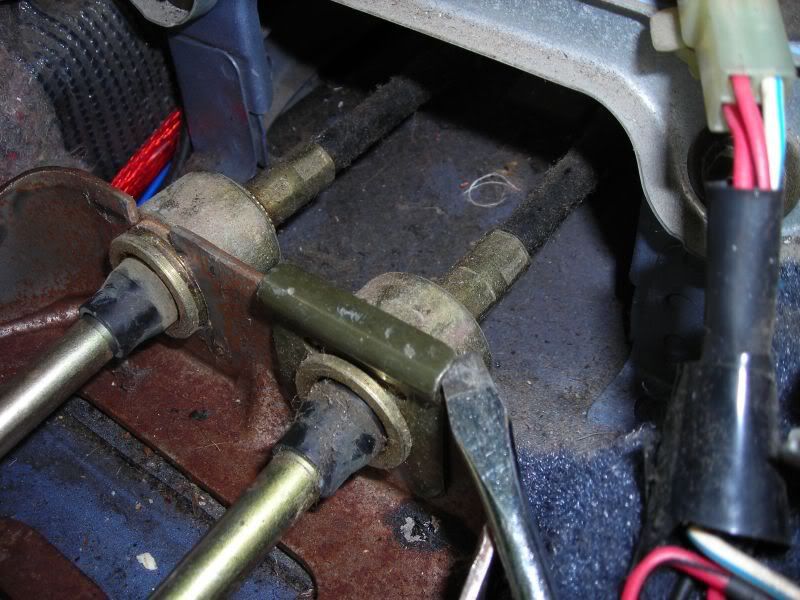
8.) Now, slide the shifter cables off from the shifter.
9.) Grab your flathead screw driver and use it to pry off the 2 clips holding the cables down(note how they are resting in place so you will know how to line them up when reinstalling the clips):
![Image]()
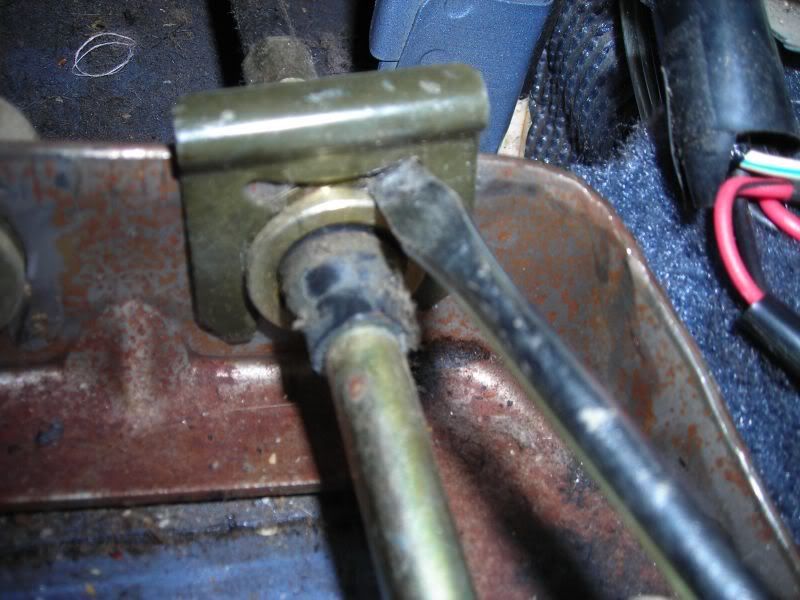
I found it easier to remove them by turning the screwdriver under side to side like this:
![Image]()
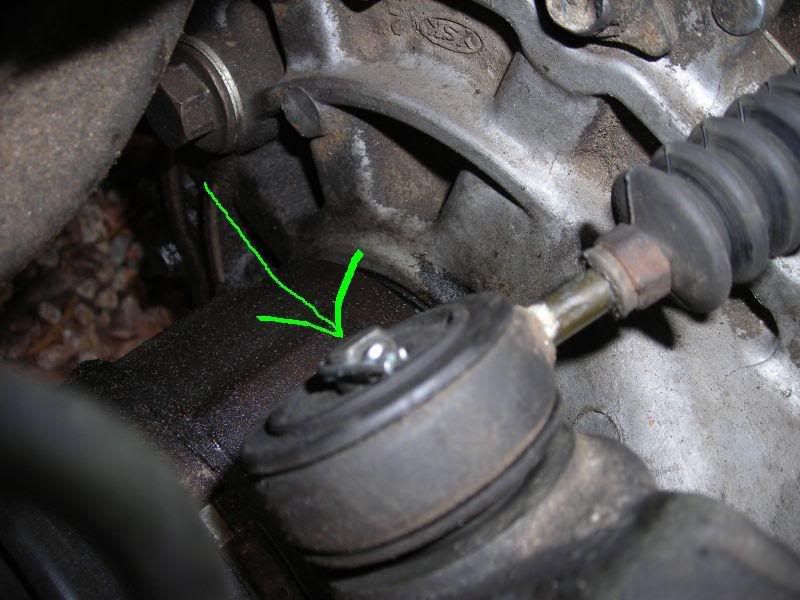
10.) Time to get out of the car and start under the hood. If you don't know where the cables are from your stand point...this will be your view and they are where the arrow is:
![Image]()
11.) Grab your needle nose pliers again and remove the cotter pins on both cables shown below:
![Image]()
Remove the cotter pin and spacer on the pic above.
![Image]()
Pull off the cables and get ready for the next step...
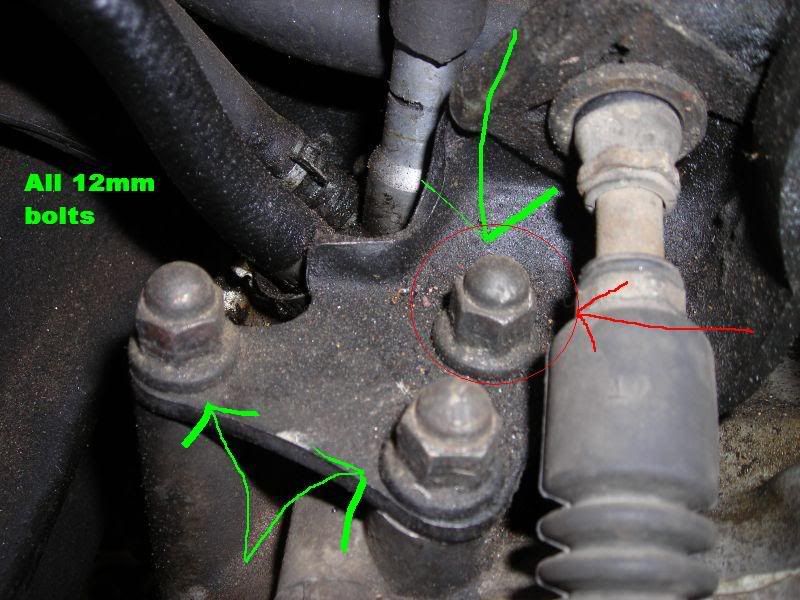
12.) Take your 12mm socket/ratchet and remove the three bolts below:
![Image]()
(NOTE: the bolt with the red arrow will need to be removed with your universal joint attached to the 12mm socket, it's a bitch to get to!)
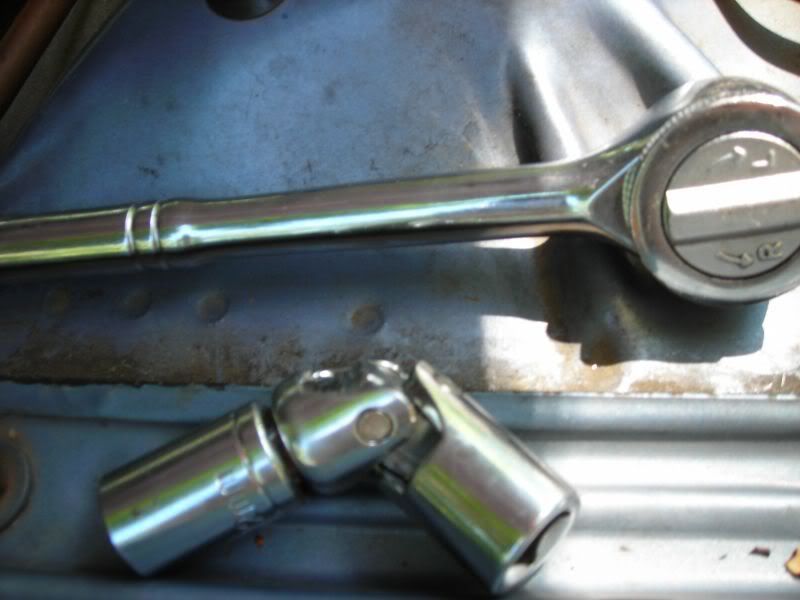
Just in case you're wondering what a universal joint is, it looks like this:
![Image]()
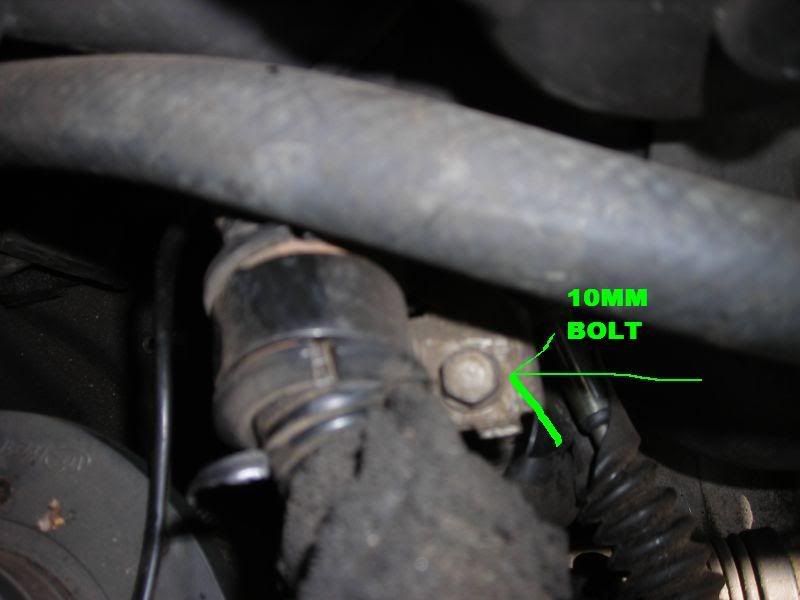
13.) Pull the plate bracket up and take both cables and pull towards you, you'll notice a bracket holding them in place, get your 10mm socket/ratchet ready:
![Image]()
14.) Set the 10mm bolt aside and now remove your intake and clean or replace the filter (might as well while its removed from the car...I did) .
.
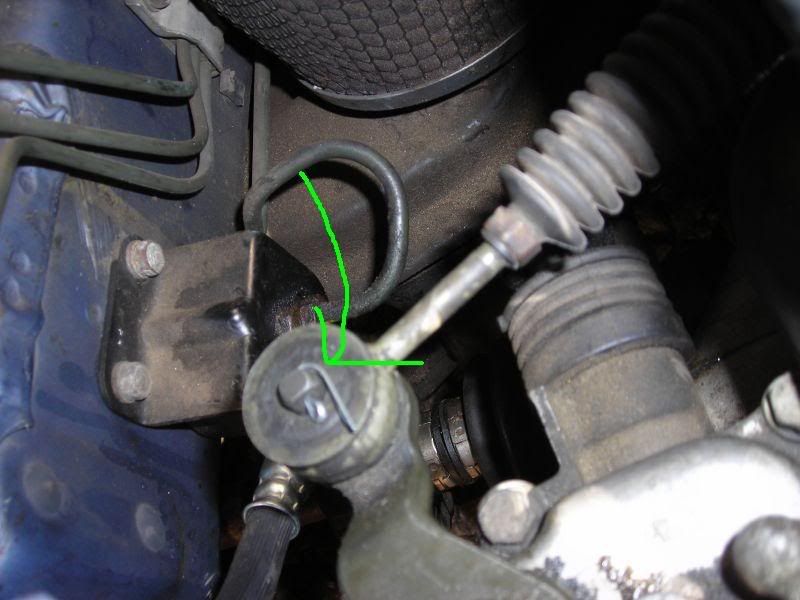
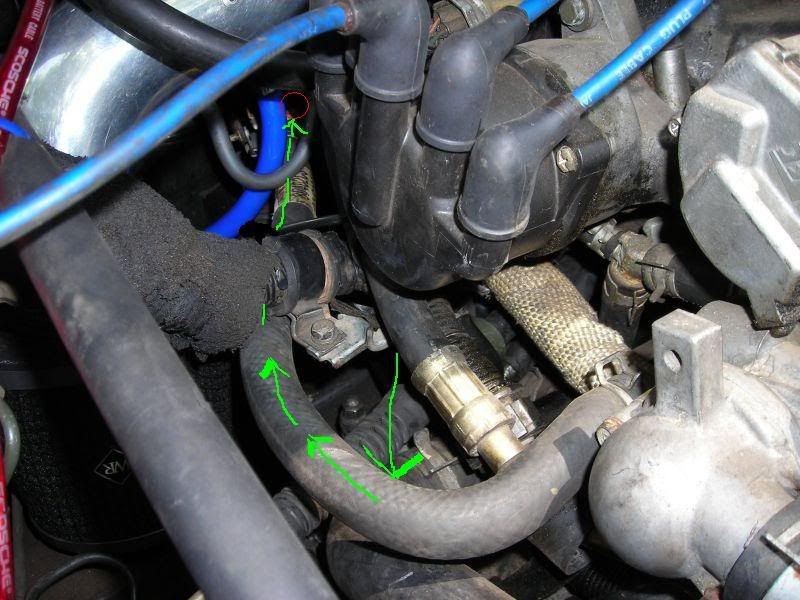
15.) This step may not be required, but I removed the clamp from the coolant hose to help free up some room. (follow the arrows to the red circle and you'll know where to remove the clamp from). You can use a rubber grommet from the chassis of the car right behind the headlight, or in our case, my friend's finger. Until it started throbbing we used the grommet, hahaha. You will lose some coolant, so be prepared to have some ready later on.
![Image]()
16.) Here comes the most pain in the ass part of the whole procedure. Be prepared to cuss, be prone to cuts and bruises, and get highly pissed! You should probably take a break now.
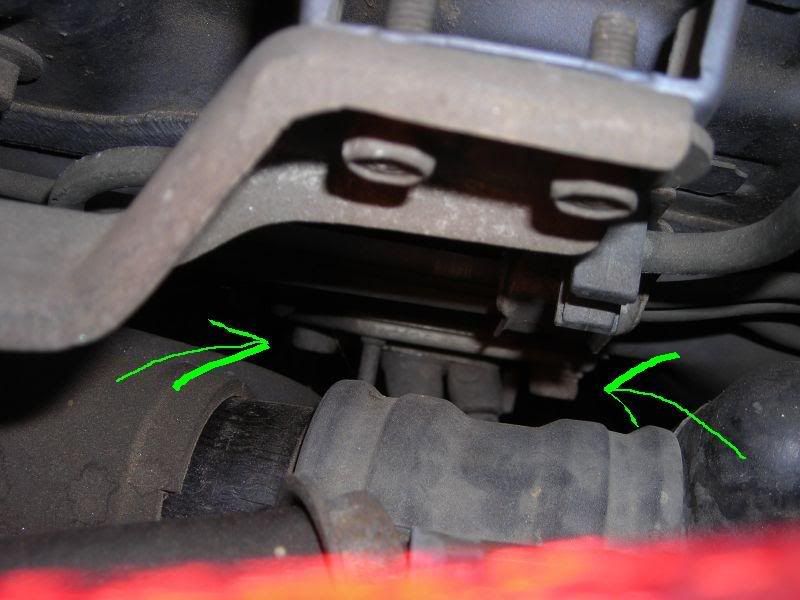
17.) Your key concentration should be on these 2 10mm bolts holding the shifter cable plate against the firewall. It is located directly below the intake manifold on the firewall.
![Image]()
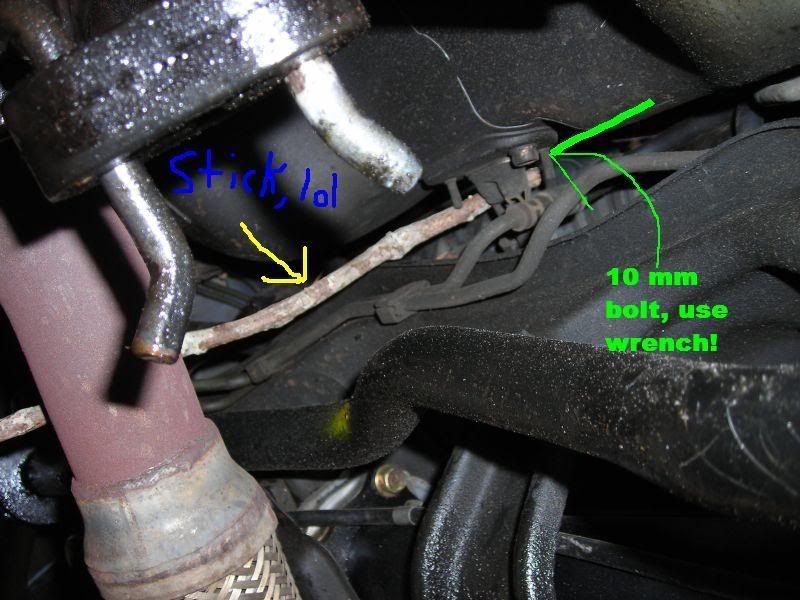
18.) Ready?? Good! Grab your flat head screwdriver and your 10mm wrench and climb under the car. Remove the 2 10mm bolts(I used a stick to pinpoint where I needed to look under the car, lol. Hey, it works:wink2:, the other bolt isn't in the picture, but its just only on the other side against the stick, hahaha)
![Image]()
19.) Set the bolts aside and grab your flathead screwdriver. Pull the old cables out and give yourself a pat on the back!!
INSTALLATION:
You're over halfway done now, be happy!!:bigsmile:
20.) Get the new cables climb back under the car and have your buddy feed you the cables from under the hood. Route them the exact way the old ones came off and into the firewall. Use the screwdriver to help feed them into the firewall. This is a royal pain in the ass, so be patient, they will come!
Now, you should just be able to feed them straight to the shifter. If not, you may have to do some customizing, lol. Remove the 2 screws on the black box and pull the carpet back enough to see the cables.
![Image]()
We ended up having to cut some hidden carpet and slide the cables in that way.
21.) If all fell through, you're in great shape now...almost done!!
22.) Slide the cables back onto the shifter and install the rubber washer back on along with the cotter pins, bend them back the way they were.
Do the same for the cables under the hood, dont forget the spacer on the one cable.
23.) Reconnect the coolant hose(if you removed it), rebolt the 10mm clamp.
24.) Rebolt all 3 12mm bolts and also reinstall your intake!
25.) Get back in the car now and take the shifter brackets and a rubber mallet(or hammer) and beat them back down, remember to notch them back in place like they were before!
26.) Reinstall all of your radio, dash, etc and you're ready to go!
27.) DONT FORGET TO TOP UP YOUR ANTIFREEZE!!(if you followed step #15)
28.) Go take it for a spin and enjoy being able to bark 2nd gear again!!!!!:burn:
Hope this helps you luders out there, I know many of us have had this experience, it is very embarassing and aggravating. Before you go buying new trannies (like I did) and spending crazy money on them....please try this 1st, I went through 3 trannies and realized it was my cables the whole time...luckily they all had warranties!!:lol:
Can we say rep points??:Rock:
- 10mm socket/ratchet
- 10mm wrench
- 12mm socket/ratchet
- Universal joint
- Jack and jackstands or just ramps
- Bricks or blocks for tires
- Srewdrivers, both phillips and flathead
- Needle nose pliers
- Rubber mallet or hammer
- An assistant to make replacement easier
- Antifreeze (only if you apply step#15)
REMOVAL:
1.) Raise the car up on ramps and block off the rear wheels with bricks or blocks(Or in my case, you'll have to Jack the car up on jackstands). Apply the emergency brake as well.
2.) Go ahead and pop the hood and have it open.
3.) Hop in the car, you will need to remove your shifter console by removing the 6 screws total. After that, work around your shift knob and it will come out. Pull the boot over the shift knob, remove the console and you're ready for the next step...
4.) Next, remove the console around your radio, ashtray, etc...Remove the 4 screws(2 on each side) as shown below:
5.) Once you have that undone you will need to remove the cigarette lighter by removing the 2 screws that hold it and remove the ashtray, twist the little bulb out from behind it, your radio/cd player, and the storage compartment.
Now the fun begins! Grab your needle nose pliers and your flathead screwdriver.
Next, you want to concentrate on this:
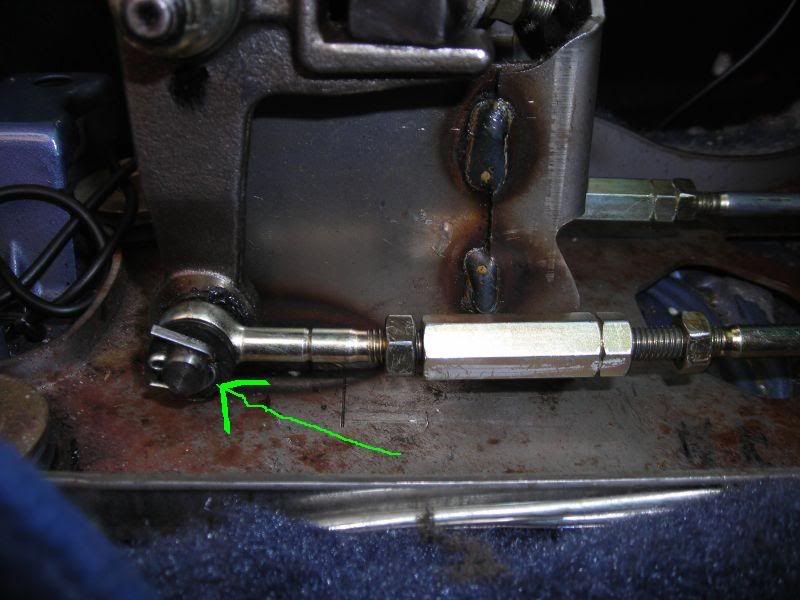
6.) Bend the cotter pin on both sides with your pliers so that it looks like this:
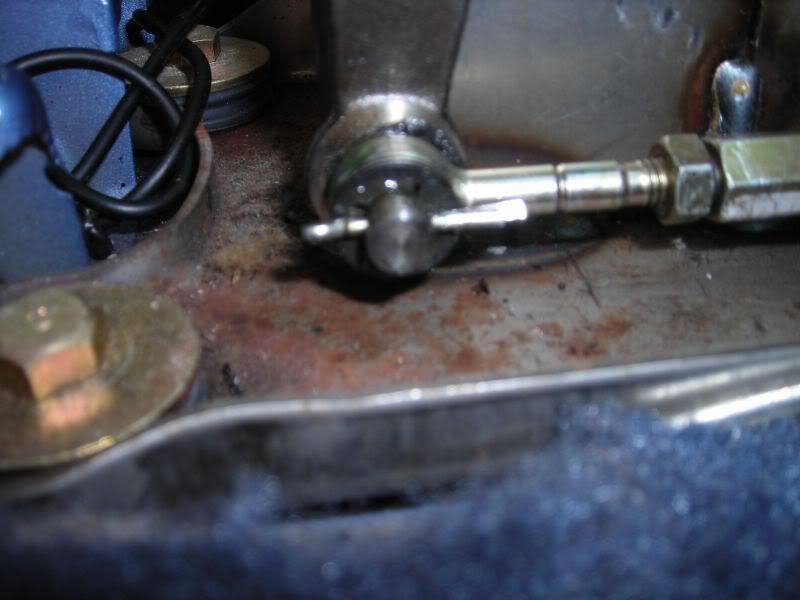
7.) Remove both cotter pins and now take these rubber washers off and keep them as you will need them for the new shifter cables:
8.) Now, slide the shifter cables off from the shifter.
9.) Grab your flathead screw driver and use it to pry off the 2 clips holding the cables down(note how they are resting in place so you will know how to line them up when reinstalling the clips):
I found it easier to remove them by turning the screwdriver under side to side like this:
10.) Time to get out of the car and start under the hood. If you don't know where the cables are from your stand point...this will be your view and they are where the arrow is:

11.) Grab your needle nose pliers again and remove the cotter pins on both cables shown below:
Remove the cotter pin and spacer on the pic above.
Pull off the cables and get ready for the next step...
12.) Take your 12mm socket/ratchet and remove the three bolts below:
Just in case you're wondering what a universal joint is, it looks like this:
13.) Pull the plate bracket up and take both cables and pull towards you, you'll notice a bracket holding them in place, get your 10mm socket/ratchet ready:
14.) Set the 10mm bolt aside and now remove your intake and clean or replace the filter (might as well while its removed from the car...I did)
.15.) This step may not be required, but I removed the clamp from the coolant hose to help free up some room. (follow the arrows to the red circle and you'll know where to remove the clamp from). You can use a rubber grommet from the chassis of the car right behind the headlight, or in our case, my friend's finger. Until it started throbbing we used the grommet, hahaha. You will lose some coolant, so be prepared to have some ready later on.
16.) Here comes the most pain in the ass part of the whole procedure. Be prepared to cuss, be prone to cuts and bruises, and get highly pissed! You should probably take a break now.
17.) Your key concentration should be on these 2 10mm bolts holding the shifter cable plate against the firewall. It is located directly below the intake manifold on the firewall.
18.) Ready?? Good! Grab your flat head screwdriver and your 10mm wrench and climb under the car. Remove the 2 10mm bolts(I used a stick to pinpoint where I needed to look under the car, lol. Hey, it works:wink2:, the other bolt isn't in the picture, but its just only on the other side against the stick, hahaha)
19.) Set the bolts aside and grab your flathead screwdriver. Pull the old cables out and give yourself a pat on the back!!
INSTALLATION:
You're over halfway done now, be happy!!:bigsmile:
20.) Get the new cables climb back under the car and have your buddy feed you the cables from under the hood. Route them the exact way the old ones came off and into the firewall. Use the screwdriver to help feed them into the firewall. This is a royal pain in the ass, so be patient, they will come!
Now, you should just be able to feed them straight to the shifter. If not, you may have to do some customizing, lol. Remove the 2 screws on the black box and pull the carpet back enough to see the cables.
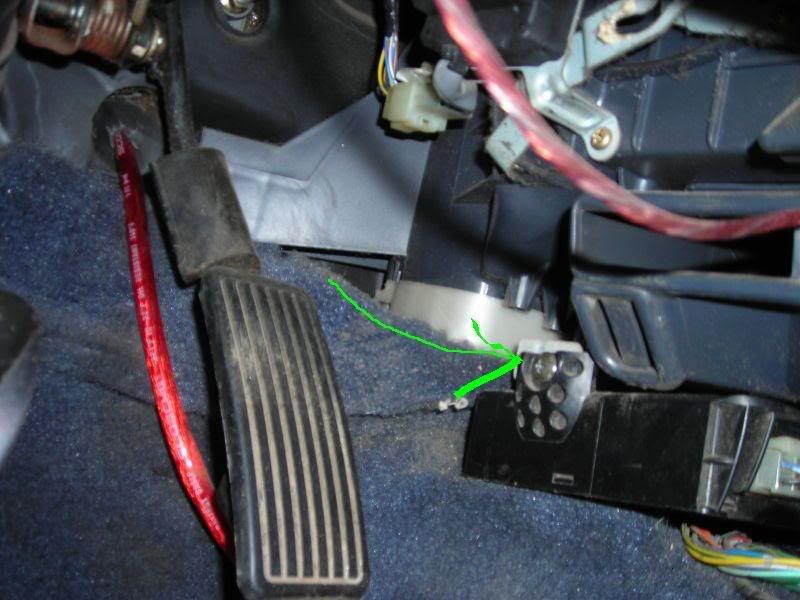
We ended up having to cut some hidden carpet and slide the cables in that way.
21.) If all fell through, you're in great shape now...almost done!!
22.) Slide the cables back onto the shifter and install the rubber washer back on along with the cotter pins, bend them back the way they were.
Do the same for the cables under the hood, dont forget the spacer on the one cable.
23.) Reconnect the coolant hose(if you removed it), rebolt the 10mm clamp.
24.) Rebolt all 3 12mm bolts and also reinstall your intake!
25.) Get back in the car now and take the shifter brackets and a rubber mallet(or hammer) and beat them back down, remember to notch them back in place like they were before!
26.) Reinstall all of your radio, dash, etc and you're ready to go!
27.) DONT FORGET TO TOP UP YOUR ANTIFREEZE!!(if you followed step #15)
28.) Go take it for a spin and enjoy being able to bark 2nd gear again!!!!!:burn:
Hope this helps you luders out there, I know many of us have had this experience, it is very embarassing and aggravating. Before you go buying new trannies (like I did) and spending crazy money on them....please try this 1st, I went through 3 trannies and realized it was my cables the whole time...luckily they all had warranties!!:lol:
Can we say rep points??:Rock:


